DAT BUGS

©2000 Does that look weird or what?

by Eddie Ciletti

I feel pretty safe predicting that no new DAT recorders will be presented at any trade shows, this year or ever.  Anyone with news to the contrary should e-mail me.  The format is far from dead and quite useable at 44.1 kHz or 48 kHz with 16-bits of dynamic range.  Attempts to expand DAT's horizons have been limited — 24-bits at the "standard" sample rates or doubled rates (88kHz / 96kHz) at the "standard" bit depth.  Tascam's DA-45 and the Pioneer / HHB  9601 are the sole respective examples.

The lack of real estate on tape is why we can't have high sample-rate cake and eat those tasty wide dynamic-range bits at the same time.  Increasing tape speed to four-times normal would reduce a 120 minute DAT to a half-hour.  Four-hour (120 meter) data DATs are in the wings ready to save the day, but few tape transports can reliably move such thin tape.  Such a Full-Monty format change would probably require some mechanical redesign as well.

 
This month I have a flu shot for some of the bugs that plague two Time Code (TC) DAT machines, with a little trickle-down to some of the more "common" recorders.  In this and future articles, some of the projects will be DIY — I very much encourage users to pop the cover and get familiar with what is "normal."  Other "non-user-serviceable" tips are FYI.  It's better to know what's coming than get caught with your pants down, or skirt up, eh?

ECONOMY OF SCALE

With the exception of the Fostex D-15, Time Code DAT decks are priced well above their "timeless" cousins.  MDMs such as Tascam's DA-98 and DA-78 are more affordable.  So is the Alesis M20.  The selling price is directly related to demand and the economy of scale.  More people need sync-able multitrack recorders than TC DAT decks, hence the price disparity.  Considering their higher price tag, TC DAT recorders are typically less friendly (lots of video-related features) and not necessarily more reliable, an annoyance that is compounded if the device in question sees infrequent use.

According to Brian Falatovich of Midwest Digital, "The best DAT machine ever made (not considering its digital converters) was the now discontinued Sony PCM-7030."  This can be confirmed by taking a peek under the hood, especially if you are familiar with other DAT decks.  While most are genetically modified consumer models, inside, nearly everything about the PCM-7030 suggests that knowledgeable professionals put great thought into developing its extensive feature set.  Compared to the PCM-2500, the PCM-7030 is quite serviceable even with its many circuit boards.  Notice I said "nearly" because this machine shared a few common flaws with many of Sony's less-endowed children.

ONE OLD WIVE'S TALE

It is a widespread rumor that Sony and Panasonic DAT decks are not aligned to the same standard.  Each company specifies their own test tapes that differ in terms of approach, yet yield the same end result.  Panasonic's consumer-based transports hold an alignment better than most of Sony's more professional mechanisms, a disparity that is easily remedied by a skilled technician. 


Figure-1A:Slant-block component parts


Figure-1B:  A "rebuilt" Sony slant-block
The illustration and photo (Figure-1A and Figure-1B, respectively) detail the "slant block," the assembly that unloads the tape from the shell and precisely guides it around the head-drum.  This part is responsible for the compatibility myth.

The Slant Block is so called because it consists of an angled post that positions the tape to match the head assembly, which is not "square" with the deck plate.  Other key components include a precision stainless-steel tape guide with a roller made from ceramic, stainless steel or plastic.  The guide and its mate — a machined brass insert — have extremely fine threads to allow precise vertical alignment.

Once in the ballpark, less than one-eighth turn in either direction will make a major difference in the output of the RF envelope (the signal from tape) when using the test tape.  In reality, the system is very tolerant of typical machine-to-machine variations.  Once the tape path is optimized, a locking screw secures the adjustment.

The fly in the ointment is that the brass insert is merely press-fit into the base of the slant block.  After repeated load and unload cycles, the two parts no longer behave "as one," causing the alignment to change every time a new tape is inserted.  Sony's new parts are no better than the originals.  Re-marrying the old parts with epoxy (after degreasing) has so far yielded a 100% success rate.


CLIMBING THE ALPS

Tascam's TC DAT decks are more affordable than Sony's hence the former find their way into many audio facilities while the latter are more common in video houses.  All of Tascam's DAT transports are made by Alps, an Original Equipment Manufacturer (OEM) responsible for the mechanisms found in the Otari DTR-90, the Fostex PD-2 (portable) and D-30 (rack mounted) TC DAT recorders.  By some stroke of luck, or genius, Fostex ditched the problematic front-loading "elevator," opting instead for a simple, trouble-free hinged loading door.  (Sony, Panasonic and Pioneer make their own DAT transports.  The Fostex D-5 and Tascam DA-20 are entirely made by Pioneer.  The transport in those machines found its way into the Fostex D-15 and PD-4 as well.)

CHICKEN, EGG or just the CLAW?

The ALPS loading mechanism is a little too delicate for impatient Americans who are accustomed to slamming VHS tapes into their home VCRs.  Cassettes not gently inserted will easily bend metal parts, pushing electro-mechanical tolerances beyond the machine's ability to compensate.  Four common symptoms plague the ALPS front-loading mechanism.  It can either be sluggish or too hungry during feeding, the latter being least desirable.  On a good day, a cassette sucked in before being securely engaged will be ejected. (On a bad day, the machine will jam.)  During the unload process, the "Central Scrutinizer" may not sense that the tape is fully ejected, causing an endless "déjà vu" of load and unload.  To spare you some mental anguish for the moment, the fourth symptom is described under the heading, "The Claw."
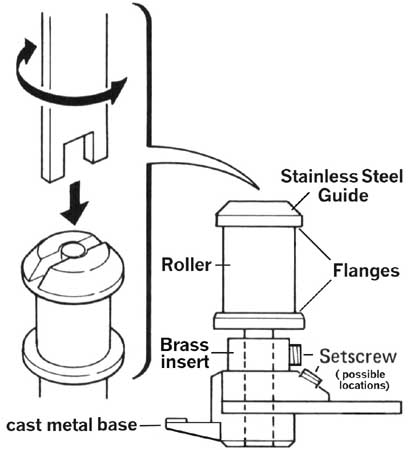
SPRING INTO ACTION

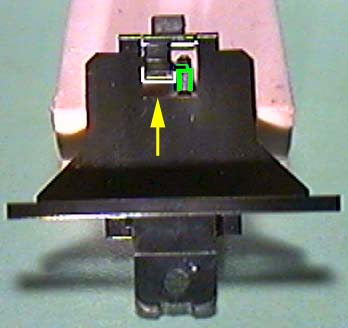
Three sensing switches are hidden on the underside of the right "junction" PCB as shown in Figure-2A.  (The visible side of this PCB is shown in Figure-2B.)  No adjustments are provided and initial attempts at creating an adjustment "window" yielded mixed results.  Since mechanical friction seems inconsistent amongst the various mechanisms, a more basic “fix,” shown in Figure Three, involves adding a spring that serves a double purpose.  As the cassette is loaded, the spring creates resistance so that the tape is fully engaged before tripping the sensor switch.  On the return trip, the spring ensures that the mechanism returns to the same "at rest" position, positively disengaging the switch. 
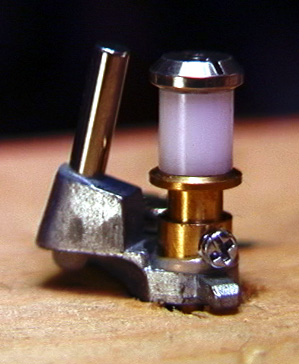

Figure-2A:  The hidden side of the junction PCB.  The white arrow points to the switch in question while the direction of travel is indicated in yellow. 
Figure-2B: The visible side of the right junction PCB where interconnections are made. The "beginning of tape" (B.O.T.) sensitivity adjustment (VR1) is also located here. 
DIY

I searched high and low for the perfect spring, finally settling on the type used by Tascam for the loading drawer of the DA-30 and DA-30 MKII (part number 5801396801).  Cut the spring in half, fold out the last coil so that it can be easily hooked and attach as shown in Figure Three, below.

 
The large spring in the center is a "modification" to the ALPS DAT loading mechanism, the success of which assumes the loading mechanism and transport have not been damaged. (Note: Under normal conditions, the job of the capstan motor is to maintain exact speed.  ALPS also uses the capstan motor to power the loading mechanism!  A series of reduction gears convert the relatively wimpy rotational energy into a force barely powerful enough to raise and lower the cassette.  The design is far from elegant.)
THE CLAW

All DAT shells have a rectangular slot designed to accept a claw that, when implemented, can assist in the positioning process.  Figure Four shows the black plastic assembly on which the claw pivots (indicated by the yellow arrow).  If users yank the tape before it is fully released, the claw will break.  This subassembly does not have a part number so it can not be replaced.  Instead, it is necessary to purchase the entire loading mechanism (a $400 part).  Ouch!

JUSTIN CASE

After installing the spring, if the claw still doesn't reliably disengage, the final tweak is to apply a slight bit of pressure to the "thrust and support" beam as indicated by the purple arrow in Figure Five.  This horizontal bar provides structural stability to the loading mechanism as well as "thrust" to trigger the claw's release. Gently apply pressure and let go.  Then load and unload a tape repeating the "pressure process" until the tape is consistently released.


Figure Four:  The yellow arrow points to "The Claw."
Highlighted in green is a metal spring that may also be damaged by impatience.


Figure Five: The horizontal support beam triggers the release of the "claw."

FOR THE SERIOUS MACHINIST

Some users are very aggressive when shoving tape into the mechanism.  One solution is to slide the transport to the rear so that the escutcheon stops the fingers before damage can occur.  The white and yellow arrows in Figure Six indicate direction as well as point out the location of three chassis screws.  The violet oval on the right side indicates an area that must be cut in order to make room for the new chassis position. 


Figure Six: Sliding the transport to the rear reduces the potential for damage.

NOTE: Early in the process of experimentation, I enlarged the switch and PCB locating holes so tho create room for adjustment.  I do not currently feel that it is necessary to make these changes.  Those inclined individual may want to inspect the lever that triggers the switch in question — for possible "distortion" from excess force.  I do recommend inspecting both Junction PCBs for cold joints and — once the loading mechanism has been removed, inspecting same for friction.  All of this intricate work requires the tenacity of a watchmaker.

END OF TAPE: Tweak Heads Take Note!!!

In providing this information, it is not my intention to take away business from either myself or from my friendly competitors.  Tape machine repair requires experience, patience, fine tools (in good condition), a steady hand, test equipment and test tapes, ample illumination, good vision and / or optical magnifiers.  That said, an educated consumer is the best customer.  Get to know what's on the inside, be good to your gear and be happy on the outside. Be sure to save a hug for your technician too!!!

I love feedback in the form of email.

Go back to the TAPE directory?

Go back to the HOME page?


Eddie Ciletti relocated his modest service facility 
from New York City to the Twin Cities 
in 1999.