What is Normal (for an Error Rate Display)© 1999 by eddie ciletti
Just before your tape deck coughs up a fur ball, funny things start to happen. DAT machines won’t renumber. Digital multi-track decks will hem and haw, stop dead in their tracks and then deliver some cryptic error message. Of the assortment of idiosyncrasies — from the digital fuzzies to any and all forms of intermittent behavior — you wish a head-clog would be the sole cause of the problem.
On the tape machine section of my website, the potions, sacred cloth and maps to the altar of magnetic technology — the rotary head assembly — are specified. As important as cleanliness is (next to dog-li-ness, I believe), it is not a panacea. Don’t be surprised when your efforts to expunge head funk — via dexterous fingers or self-cleaning tape — don’t make a significant improvement. Do be happy if things aren’t any worse!
I have long been an advocate for full-time display of the Error Rate (Studer labels this feature "Quality" on the V-8). You really do want to know when it's time to clean the heads. Unfortunately, with an idiot light as the only messenger, it’s already way too late.
ALL ASIDES, ASIDE
Soft-core preventive maintenance requires that you know how to access the Error Rate Display if, in fact, it is (and should be) a feature. (Manufacturers take note: CD Recorders need Error Rate Displays, too!) The procedure for communicating with the ghost in the machine should be in the operator’s manual. Sony considers this "technician-only territory," but the secret is detailed below.
The "error rate" or "block error rate," (BER) indicates the number of errors encountered within a given amount of time. Typically the display will be updated in one-second intervals. For the first time, I want to show you where on the display to look. Once the secret is learned, check Error Rate often so you’ll know what is normal and what is not.
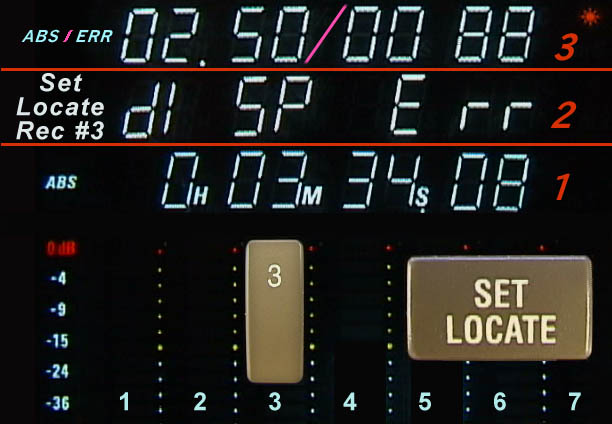
First stop, all of the "post-blackface" Alesis adats with the exception of the M20. Photo One is a composite of three display states — labeled in red as 1, 2 & 3. In the Normal state of the display (red #1), ABSolute Tape Time is indicated as H:MM:SS:99 (hours: minutes: seconds and hundredths of a second). Two buttons are inset below— SET LOCATE and RECORD ENABLE 3 — they comprise the secret "password" for accessing the Error Rate. Pressing them together momentarily changes the display to the cryptic " dl SP E rr," (red #2) meaning that the Error Rate Display is about to appear.

PHOTO ONE: The three steps to reading errors on the Adat XTAt the top of Photo One (red #3), the display now shows an abbreviated tape counter — MM:SS — the other four digits to the right are now devoted to error indication. Under "ideal" conditions, the display should read "0000," with random bumps under 0050 being typical. Numbers that do not get below 0100 or seem "stuck" between 250 and 500 hopefully indicate a simple head clog. (A very worn head is the next likely possibility.) Erratic numbers, or numbers above and beyond 1000, point either to a very bad section of tape or a major electro-mechanical malfunction, the latter dictating a trip to the service center.
When the going gets rough, an orange "sun" appears to the right of the tape counter. When the sun is "full on" you’ve got problems. But sometimes a reformatted tape will cause the sun to occasionally shine. If a quick detour to the error window reveals a low number, the problem is benign.

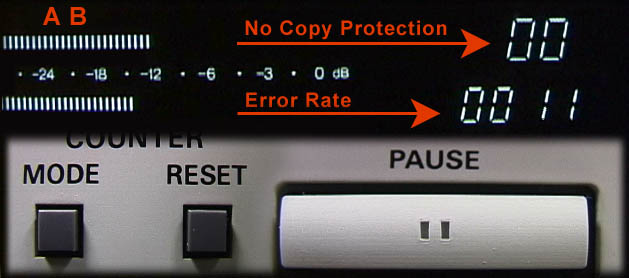
PHOTO TWO: The result of button pushing to access error rate on most Panasonic modelsPanasonic’s "family" of machines — SV-3200/ -3700 / -3800 / -3900 / -4100 — display errors in a similar numeric fashion. Photo Two shows the secret buttons — MODE-RESET-PAUSE — that, when simultaneously pressed — unlock the Error Rate door.
The "AB" in the top left corner indicates the error rate for both "A" and "B" heads. (It is also possible to look at the "A" or "B" head alone, on some models.) In addition, the "00" at the top right corner indicates the lack of copy protection. (There are two additional states, "10" indicates that one copy can be made. An "11" will not allow any copies to be made.)
My DAT deck preference is the Sony PCM-R500 an assesment based primarily on its four-motor transport. No other DAT deck in this price class can make the claim. Its weakness is not that it doesn’t have an Error Rate display, but that Sony does not want users to know about it. It took a bit of news-group surfing (my least favorite pastime) and a few phone calls to Dan Haugh at American Digital ( 888-USA-DATS ). You can find other useful DAT info at the Dat Heads website as well as Terrapin Tapes ( 800-677-8650).
If you own more than one Sony product, there's a good chance one of the remote controls looks similar to the RM-D757 that came with the PCM-R500. Some remotes make use of all the buttons while the DAT remote (Sony part number 1-473-921-11) "hides" three buttons under the plastic label laminate. In order to access the error rate display it is first necessary to "modify" the remote control by cutting away a portion of the laminate over the area labeled "Test" as shown in Photo Three. The hidden "Test" key is to the right of the Open / Close button just above the Counter Reset button. My mod looks so neat and tidy, but in reality, it's a hack job. It would take a Paul Prestopino (my mentor) to do a neat and tidy job of this. Thanks to Photoshop, I was able to make it "look" completely beautiful. That said, please note that the "display" in Photo Three is NOT underneath the laminate. It will actually appear on the machine's misplay panel. The Error Rate "feature," which is intended for technical evaluation during service, is also accessible on other Sony DAT machines such as the PCM-2800.
|
Apres surgery, press 9, then 1. You will see the "91" in the Margin area of the machine’s display. If so, then press the Test key. You should now see an "A" on the far left of the display followed by four pairs of numbers as shown superimposed at the bottom of the Figure Three. The most I can tell for certain is that low numbers are good (zeros are best). Don’t be afraid, there is plenty of built-in redundancy and tolerance for errors. |
Figure Three: Modified Sony Remote control to access error rate. Please note: The numeric display (above) appears on the machine only! |
I wish all manufacturers would use me as their vehicle to spread the word, not of ignorance and fear, but of enlightenment. I ask all users to politely make your needs known — via phone, fax, email and at trade shows. It is always better to anticipate a problem than get caught with yer pants down or skirt up. Error Rate displays are a good thing.Thanks to David Hough, audio dude for the PBS series "Austin City Limits," for unearthing this "secret." From a stock remote, head hours are accessed by pressing "mode" and "0."