Get into the Grooves
from March '06 Tech's Files for MIX Magazine
©2005 ~ 2006 by Eddie CilettiJust as digital audio jump-started the vintage analog craze, club DJs have kept turntable and cartridge manufacturers in production. This month's focus is turntable optimization for fun, profit and uh, sonic excavation.
The most popular (and most often cloned) DJ turntable is the direct-drive Technics SL-1200. Audiophiles would choose something more esoteric for archiving and transfers - preferably a belt drive model - but nearly ALL "respectable" models have common design goals and features.
FAMOUS PICK-UPS
The front end of every turntable is the Cartridge, a user-option that is dependent upon personal taste as well as playback requirements. For example, to play a century's worth of recorded material requires a wide range of styli - a needle for every groove, baby - for which Stanton cartridges are the most easily outfitted. For more info see "Groove ME."
The cartridge is typically mounted to a removable head shell at the end of the "tone arm," a name that dates back to the acoustic phonograph era. (Purists will sacrifice this convenience for reduced mass.) Regardless of cartridge choice, the first goal is mechanical alignment - the five primary parameters being overhang, vertical tracking angle, horizontal tilt, stylus pressure and anti-skate.
To understand why the interrelationship of tone arm, cartridge and stylus are important, you must first understand how a master record (or Dub Plate for DJs) is created on a Lathe. Aside from the turntable, the key component is the cutter head, which like a loudspeaker consists of a magnet assembly and voice coils that convert electrical energy into motion. The coils connect to a shaft (or cantilever) to which a cutting stylus is mounted. Grooves are cut into an acetate-coated aluminum disc.
The cutter is linearly driven through the radius of the disc by a "feed screw," the speed (or Pitch) of which is computer-determined based on a combination of program level and groove depth. Obviously the goal is to playback the records exactly as they were cut, with the stylus precisely tangential to the groove and at right angle to the radius. But playback with a linear arm is not so easy because to follow (rather than create) the varying groove pitch requires precision, frictionless mechanics coupled with a bit of electronic intelligence. Only the most esoteric turntables are so outfitted and still functional.
Enter the more common, and economical, pivoting-style S-Shaped and straight tone arms. Both make an arc across the record, and while not a perfect solution, each keep the cartridge within a few degrees of optimum. The longer the arm, the more gentle the radius. The first mission critical tweak is the soon-to-be obvious overhang adjustment.
NOTE: The primary disadvantage of pivoting arms is their tendency to "skate" across a record (either toward or away from the spindle). Leaning on either side of the groove wall causes wear, mis-tracking (distortion) and groove hopping. The Anti-Skate adjustment counteracts this urge.
Over the years, manufacturers have created an assortment of tools, templates and jigs to assist the user in optimizing overhang, the phono-equivalent of tape-head azimuth. Elongating the cartridge mounting holes in the head shell, for example, allows front to back cartridge tweaking.

Figure-a: Technics overhang tool (part number SFK0135-01) with Audio Technica Shell and Cartridge.
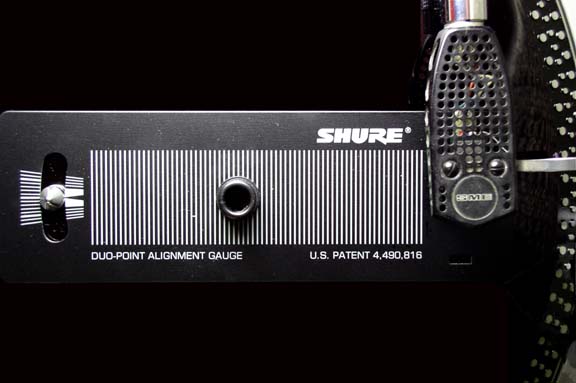
Figure-b: Shure's overhang tool has a saddle for the V-15 series cartridge to snap. Alignment errors are magnified at the spindle.STRAIGHTEN UP AND FLY RIGHT
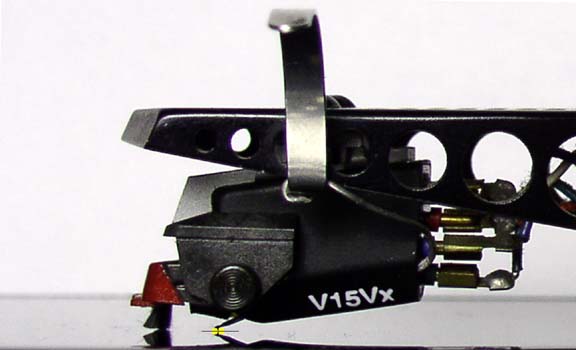
The cutting stylus is not perpendicular to the groove but some 15- to 20-degrees off axis like the claws of a rake - you know, for grass and leaves - and so, Vertical-tracking angle (VTA) is sometimes referred to as Standard Rake Angle (SRA). To get VTA in the ballpark, start by observing the arm while a record is being played. The arm should be parallel to the record. See Figure-c.
Figure-c: VTA (vertical tracking angle, highlighted in yellow) is optimized when the arm and head-shell are parallel to the disc surface. This is accomplished by raising or lowering the arm at the pivot point (see Figure-d).
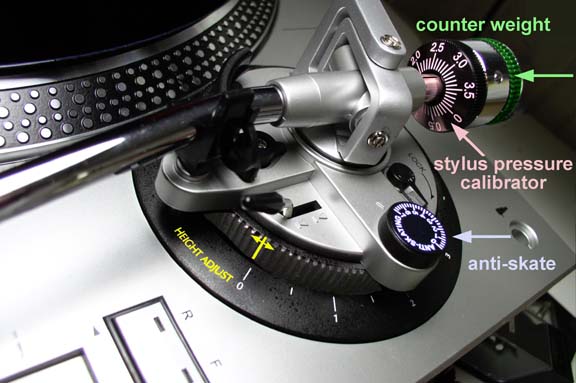
Figure-d: Adjustment locations for the Technics SL-1200 series and its clone (the Audio Technica AT-SL120 is shown here).
Both the Technics SL-1200 and the Audio Technica AT-SL120 (shown in figure-d) allow the arm to be raised or lowered by an outer ring located below the arm's pivot area. I found the AT-PL120 adjustment did not go low enough so another slip mat was added to raise the disc up.
STYLUS PRESSURE
In order for the stylus (needle) to accurately trace the grooves, the cantilever to which it is attached must be highly flexible in both the lateral and vertical planes as determined by the rubber-like substance used at pivot point. User requirements determine the actual tracking force.
Audiophiles and archivists are like Tour de France racers, striving for the lowest mass and resonance, taking advantage of space-age cantilever and tone-arm materials so that the force exerted by the stylus on the grooves is as low as possible. By contrast, a DJ wants a cantilever that can tolerate scratching without bending. Not only is the cantilever (which is hollow) thicker and more robust, but its suspension is tighter to allow increased tracking force without the cartridge body dragging on the record.
To set stylus pressure it is first necessary to minimize the anti-skate. Calibrate the arm by turning the counter weight until the arm floats. Without turning the counterweight, the black "calibrator" ring is rotated until "0" lines up with the black stripe on the arm, so that the arm still floats. Now rotate the counterweight until the calibrator ring indicates the desired force. With the anti-skate set to the same value and the turntable spinning, lower the needle down on groove-less land - in between two tracks, for example - the arm should stay in place until a groove catches the needle. Increase anti-skate if the arm wanders toward the spindle or decrease if it wanders toward the disc edge.
GROOVE ME
For a standard stereo record, the playback stylus (needle) contacts the groove wall at 0.7-mil (.0007 inches). With no modulation, the top of the groove - at the disc surface - is typically no more than 2-mils wide (.002 inches) so that 400 grooves can be squeezed into an inch for a standard stereo LP. By contrast, the kick and power of a club track requires increased depth - to keep the needle from bouncing out of the groove - expanding the pitch to less than 100 grooves-per-inch.If, like me, you play 78RPM records for fun as well as archiving purposes, you'll need something other than the aforementioned stereo needle, which typically has a 2.7- to 3-mil tip radius and costs around $50. Different eras and wear patterns require a wider tip radius range - from 2-mil to 5-mil for example, where prices are easily three-to-five-times standard.
Last fall I purchased two Audio Technica AT-PL120 turntables - one for me and one for my dad - specifically for its ability to play 78 RPM records. While the AT looks like an exact Technics clone, pressing both the 33 and 45 buttons engages the high-speed mode, although there is no strobe to indicate speed accuracy.
NOTE: While the stock SL-1200 has two speeds, there is an after-market 78RPM mod available, but it's not for sale in "kit" form.
The next time I tackle this subject will be to address stylus-size optimization, preamps, disc equalization and artifact-removal software. Until then, groove on!
~~~~~~~~~~~~~~~~~~~~~~~~~~~~~~~~~~~~~~~~~~~~~~~~~~~~~~~~~~~~~
Eddie credits his dad not just for inspiring this column but also for inspiring his life and career.
~~~~~~~~~~~~~~~~~~~~~~~~~~~~~~~~~~~~~~~~~~~~~~~~~~~~~~~~~~~~~