How a 4 track session inspired a 24 track guitar amp modification
Copyright January 2012 by Eddie Ciletti
Those of us who have suffered through uncooperative guitar rigs are especially appreciative of guitarists who not only can play, but who intuitively know which axe to use and how to complement it with electronics and effects. From an outsider's perspective it may seem like black magic, but in reality, there is a scientific method to the madness, even if it's distilled from obsessive woodshedding and successive approximation, a.k.a. trial and error!
Matching up instruments, pickups, effects, amplifiers and speakers can be a very spendy tweak-fest. Or is it a very tweaky spend-fest? That said, my students are not bathing in the warm glow of green cash, so I help with affordable guitar amp tweaks from the inside out. Because it is important to know where to point the finger - even if overstating the obvious - start by asking these questions...
(a flow chart comes to mind)
Q-1: Is the guitar amp consistently not in the ballpark no matter who plays through it and no matter what axe is connected?
A-1: If yes, try connecting the amp to another speaker cabinet. If the sound improves, it could be the speaker, so proceed to Q-5. For combo amps, there is also the possibility that one or more of the tubes are microphonic - that's next month's column, but one of the reasons an alt cab might not improve the sound.
Q-2: does the instrument sound good with any other amp and speaker combo?
A-2: If yes, proceed to Q-4. If no, proceed to Q-3. If confused by all that, just read on...
Q-3: Is it my axe or my amp?
A-3: Assuming the axe is fun to play and capable of being in tune - up and down the neck - there are plenty of pickup options. Back in the day, Fender amps were intended for Fender instruments and the same applied to Gibson's products. It was the geek version of an 'arranged marriage.' Cross-pollinating the two heightened one's awareness of pickup and preamp variations and while pickups are not my area of expertise, their relationships with electronics are. (See Q-4.) If you've got a second- or third-hand axe, have someone who knows guitar innards to inspect the wiring. For something so simple, it is amazing how messed up some can be...
Q-4: Do instruments have special relationships with their amplifiers?
A-4: Why YES! The EQ section of guitar and bass amps - known as the Tone Stack - can be genre and instrument specific, but the circuitry is simple as you'll see at the HOT ROD MODS heading.
Q-5: There are so many speaker options. How do I choose?
A-5: SPEAK EASY
Vintage and Retro speakers can be expensive, but instrument speakers are neither high fidelity nor fancy - they act as filters and resonators - which is why we generally prefer their 'altered' tone over a full range HiFi speaker. Table-1 shows how speaker diameter changes two (of many) loudspeaker parameters - Frequency Response and Free Air Resonance (Fs). For the same raw materials - cone, surround and spider - increasing cone diameter increases mass, which degrades high frequency response (filter) and shifts the Free Air Resonance (Fs) down. The HiFi 'cure' would be to reduce the woofer's mass by using 'space age materials,' like a thinner - but equally rigid - cone material. A dark woofer is preferable when it hides the less desirable high frequency distortion artifacts.
Put your ear close to a disconnected woofer and tap on the cone - thump, thump, thump! That's the Free Air Resonance. (Fs is THE parameter you're looking for in a sub kick woofer.) Now short out the speaker terminals with a clip lead or a dollar coin and notice how the resonance disappears. This exaggerated difference is similar to the way vacuum tube and solid state amplifiers affect a speaker's personality - an effect known as 'damping factor.' You can do a similar test with a powered monitor's woofer. Starting in the OFF state, tap the woofer a few times to get used to its tone and then power up, dry as a bone!
Diameter 8-inch woofer 10-inch woofer 12-inch woofer response 65Hz~4.5KHz 38Hz~3KHz 38Hz~2.5KHz Free Air Resonance (Fs) 65Hz 38Hz 38Hz Link http://www.mcmelectronics.com/product/55-2950 http://www.mcmelectronics.com/product/55-2951 http://www.mcmelectronics.com/product/55-2952 price $13.38 $17.50 $25.72 Table-1: Three woofers built from the same materials, allowing comparison of the effect diameter has on two parameters resulting in what we might perceive as warm or bright, for example. Compared to vintage and retro designs, these three are available at a price that won't break the bank, allowing a place to start with some wiggle room to experiment.
HOT ROD MODS
The seed for this column started with an analog recording session to 4-track half-inch tape. My class was doing a demo for a student band. Drums and bass were mixed to track-1, the lead vocalist went direct to track-2 and two guitars got their own space on tracks 3 and 4. The lead guitarist had his parts and tone, but the rhythm guitar needed nuance on multiple levels - production, tone and performance and his Hot Rod Deluxe amp wasn't helping...
What we gleaned from the demo experience was applied to the 24-track session. We found sweeter cymbals, replaced the snare head and swapped out the Hot Rod Deluxe for my own customized studio amp - a Fender Pro Junior (with the 10-inch speaker in Table-1, MCM part number 55-2951). We also swapped out the electric (rhythm) guitar for an acoustic with a pickup.
After the session my assistant, John Kargol, told me that his Hot Rod Deluxe had similar problems. A quick web search yielded a schematic. During our tweak session, John adjusted his amp based on hours of experience and I listened, tried to dial in a better tone and concurred with his analysis - too much gain and too much bottom.

Figure-1: Simplified Fender Hot Rod Deluxe preamp schematic. Capacitor C1 shown in Reverse Video is the key component change.
HOT ROD 101: TONE MOD
From the outside, a Hot Rod Deluxe chassis has a vintage, tweed-era look. But modern amps are expected to toggle between Rhythm and Lead (Drive) settings - via footswitch or front panel - and to do that requires relays (K) and switches (S). The letters relate to 'part designations' on the schematic (See Figure-1).
Like most modern amps, the printed circuit board (PCB) construction does not lend itself to tweaks as compared to older turret board designs. This "restriction" guided us to choose the 'low hanging fruit' approach - we clipped out the component in question and tacked in a decade box to audition alternate values. Afterwards, the PCB was removed and the new component properly soldered in.
While a guitar amp's EQ - a.k.a. the Tone Stack - has no 'unity' setting, the Tone controls 'should' be able to live in their center region to allow boost and cut. This was not the case with the Hot Rod Deluxe and so it became our goal. Rather than attack the Tone Stack, we started at the First Gain Stage, which is one-half of a 12AX7 (V1a). There, Capacitor C1 is in parallel with cathode resistor R5 (1k5?). NOTE: uF = micro-farads.
 |
 |
|
|
|
Removing C1 (47uF) will reduce the gain by 6dB (allowing local negative feedback). Replacing C1 with a smaller value (.22uF) creates a high pass filter, restoring the gain in the desired frequency range (low-mids and up) while reducing enough low end so that the Bass control could live in its mid position. This is similar to what Drive Relay (K1B) does at the second gain stage (V1B) when (S1A) is set to Bright. (See Figure-2.)
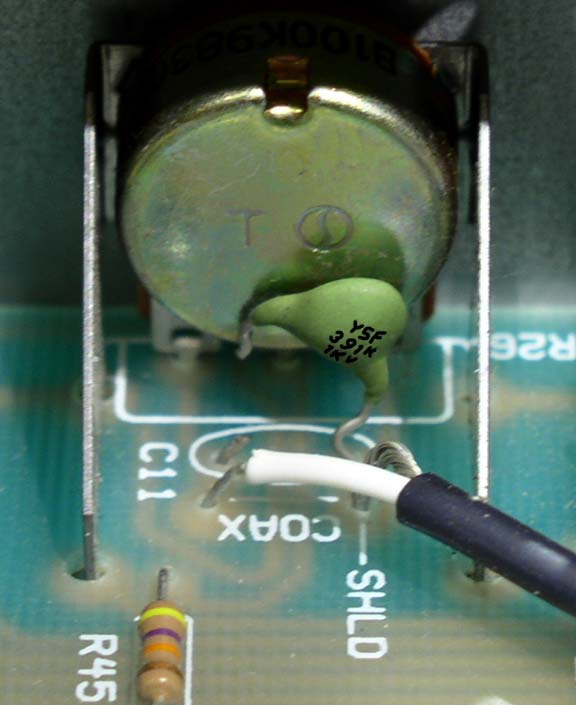
In Drive mode, C23 and C4 act as high pass filters, reducing the low-end mud that results from pushing an amplifier into distortion. C3 and C11 act as low pass filters, polishing the rough trebly edges off of the less desirable distortion artifacts. With the Rhythm / Clean channel greatly improved and Drive mode moving toward the goal the last step was to remove C11 - a 320pF cap in parallel with the R26, the Master Volume Control (pink insert). This cap creates a gentle a low pass filter, as does C3 (250pF). Had John been more into pushing the overdrive, C11 would not have been removed.
This is part-1 of 3. Bug me if ya want the other mods posted - a real master volume control and a surprise tweak.