SPRING FEVER
©1997
by Eddie CilettiThis article will explain how to extend DA-88 head life and improve adat pinch roller pressure. It takes a delicate touch. More than a few machines make it to my shop with missing screws, loose screws, chewed up or busted screws and screws in all the wrong places. Sound like a Country Song? Before going on a damage spree, please read the article, "How to Use Your Tools."
The point of combining DA-88 and adat information into one article is to demonstrate the effect of Springs. It is not safe to assume that the correct amount of tension or pressure — depending on application, of course — is being delivered. Tension gauges and jigs are expensive, but a little deductive reasoning and comparative analysis will suffice.
Here are two examples….

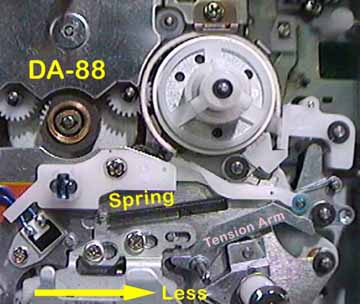
Photo One: View of DA-88 transport showing reel tables and back-tension mechanism.
Please note: This view is "upside-down" if the face plate is against your chest.DISTRICT ATTORNEY: ATE E. ATE
Wanna know how to extend DA-88 head life? Pop the hood and check the position of the tension spring. Photo One is the "upside-down" view of the DTRS transport TASCAM uses in their DA-38, DA-88 and DA-98. Older DA-88's may have the tension set too high. Worse yet is that the fan may also contribute to increased tension by sucking in dirt through the tape loading door. A check-up at 250 hours may seem premature, but an early evaluation and a possible correction could save a life.
EMPHATIC NOTE: DA-88 owners must reverse the fan and install an external filter. See the Fan Modification Aritcle. Then have the transport thoroughly cleaned and re-tensioned. It could mean the difference between 750 hours and 1500 hours of head life. Despite what you've heard, a DA-88 in a clean room environment can get up to 2500 hours of head life. The DA-38 and DA-98 have no fan and will therefore not have many of the problems suffered by early DA-88 users.
Click here for more about the DTRS family.A warning before experimenting with the tension: Check and document the total head hours as well as the error rate. Click here to learn how to query the DA-88. Worn heads require more tension to keep the error rate down, but new heads need almost no tension. To adjust tension, loosen the two screws that secure the tension plate. If the front panel is facing your chest, slide the plate to the left. Again note that the image shown — Photo One — is upside-down, but that the arrow indicates the correct direction. After making the adjustment immediately check the error rate — not just of a previously recorded tape (you’ll see only half the change) — but also on a tape formatted "post tweak."

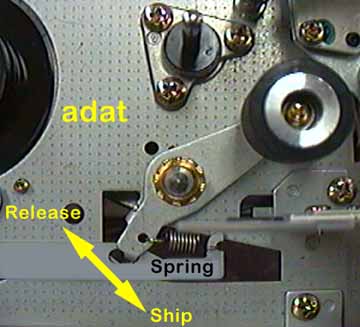
Photo Two: Close-up of adat transport detailing Capstan and Pinch Roller mechanism.adat TIRE ROTATION — Lack of PINCH ROLLER PRESSURE could cause errors toward the end of a reel of tape!!!
Increased errors toward the end of the tape — especially after 35 minutes — could be an indication of insufficient pinch roller pressure. This could very well be the case for an Original Formula "black-faced" adat, especially one that has 3,000 plus hours. Lots of adat users regularly change the Pinch Roller along with other rubber parts, but few consider that the spring responsible for the pressure might be fatigued. At the time this article was written, the part number for the spring had not yet been solidified. Call Alesis Technical Support at 800-525-3747, ask for the spring by name and see if they've created a part number for it.
HOW TO: Remove / Replace the PINCH ROLLER, ARM and SPRING Assembly
Rough handling during shipment could cause a "black-faced" adat's pinch roller arm to come loose. which could potentially damage the heads. (Alesis created a "shipping mode" for the XT that positions the arm so this won’t happen.) Photo Two shows the clockwise direction the pinch roller arm must be rotated to release it from the chassis. The arm has a "claw" that restricts vertical — but not rotational — movement. Rotate clockwise until the claw clears the cut-out or "key space" area of the chassis, then lift up.
If dirty, clean off the contact areas with a cotton swab. Be sure to re-apply lube that might have been removed by cleaning, but do not overlube! (Lubriplate — a white, lithium grease — is available at Radio Shack and MCM.) Replace the spring and snap the assembly back into place.
Well, that’s it for now.
I love feedback in the form of email.